Explore, code, and export a Hedera AI Agent.
Quick no-code configuration for your Hedera AI Agent.
 Agent Lab provides a guided path from no-code experimentation to exporting your agent code, enabling developers to prototype quickly and providing a working starting point they can customize and deploy.
The tool provides different ways to build and interact with the agent:
* Use the **Agent Builder** to configure your agent with no code.
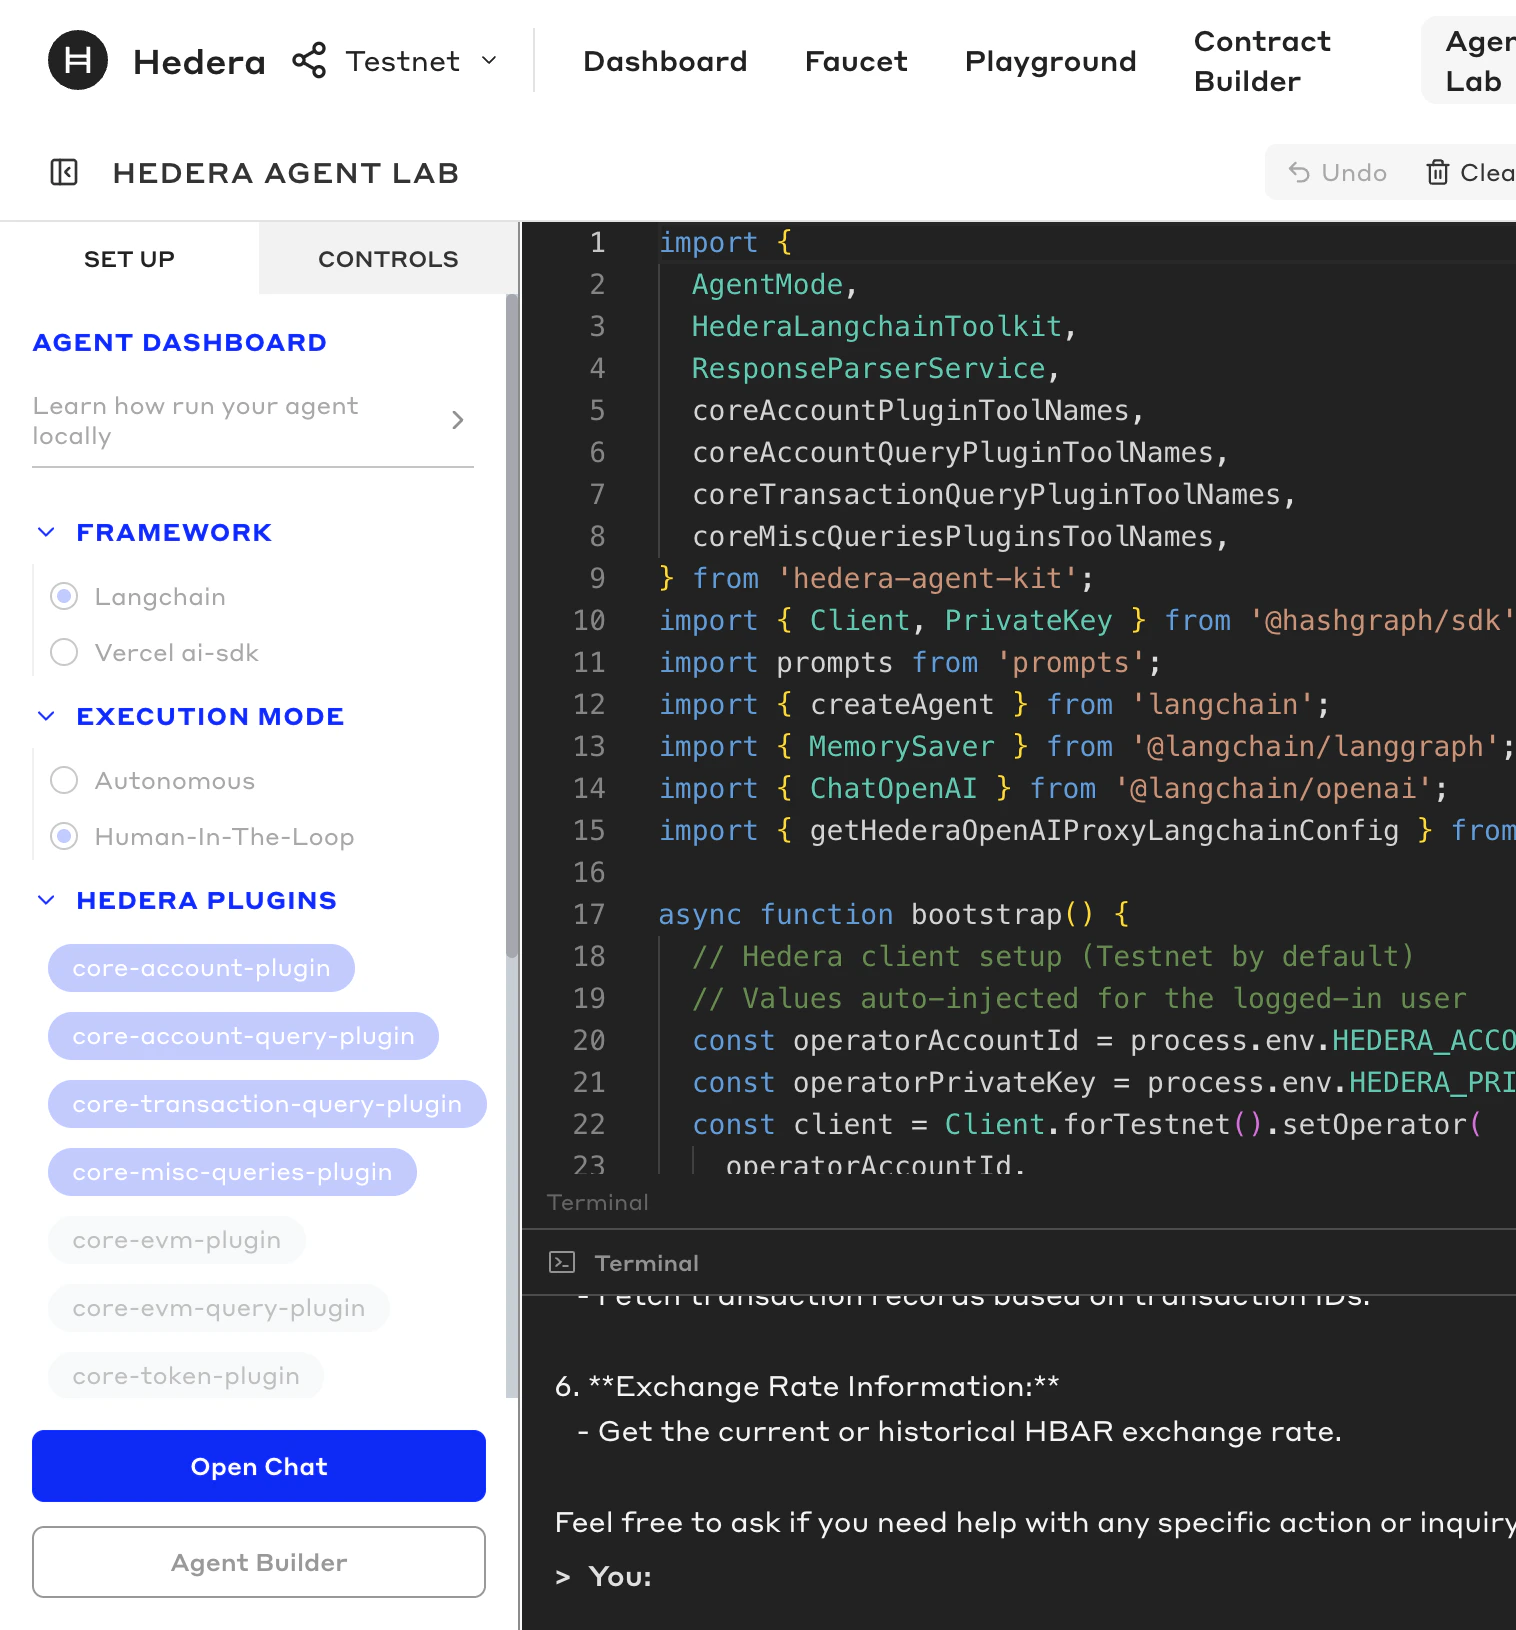
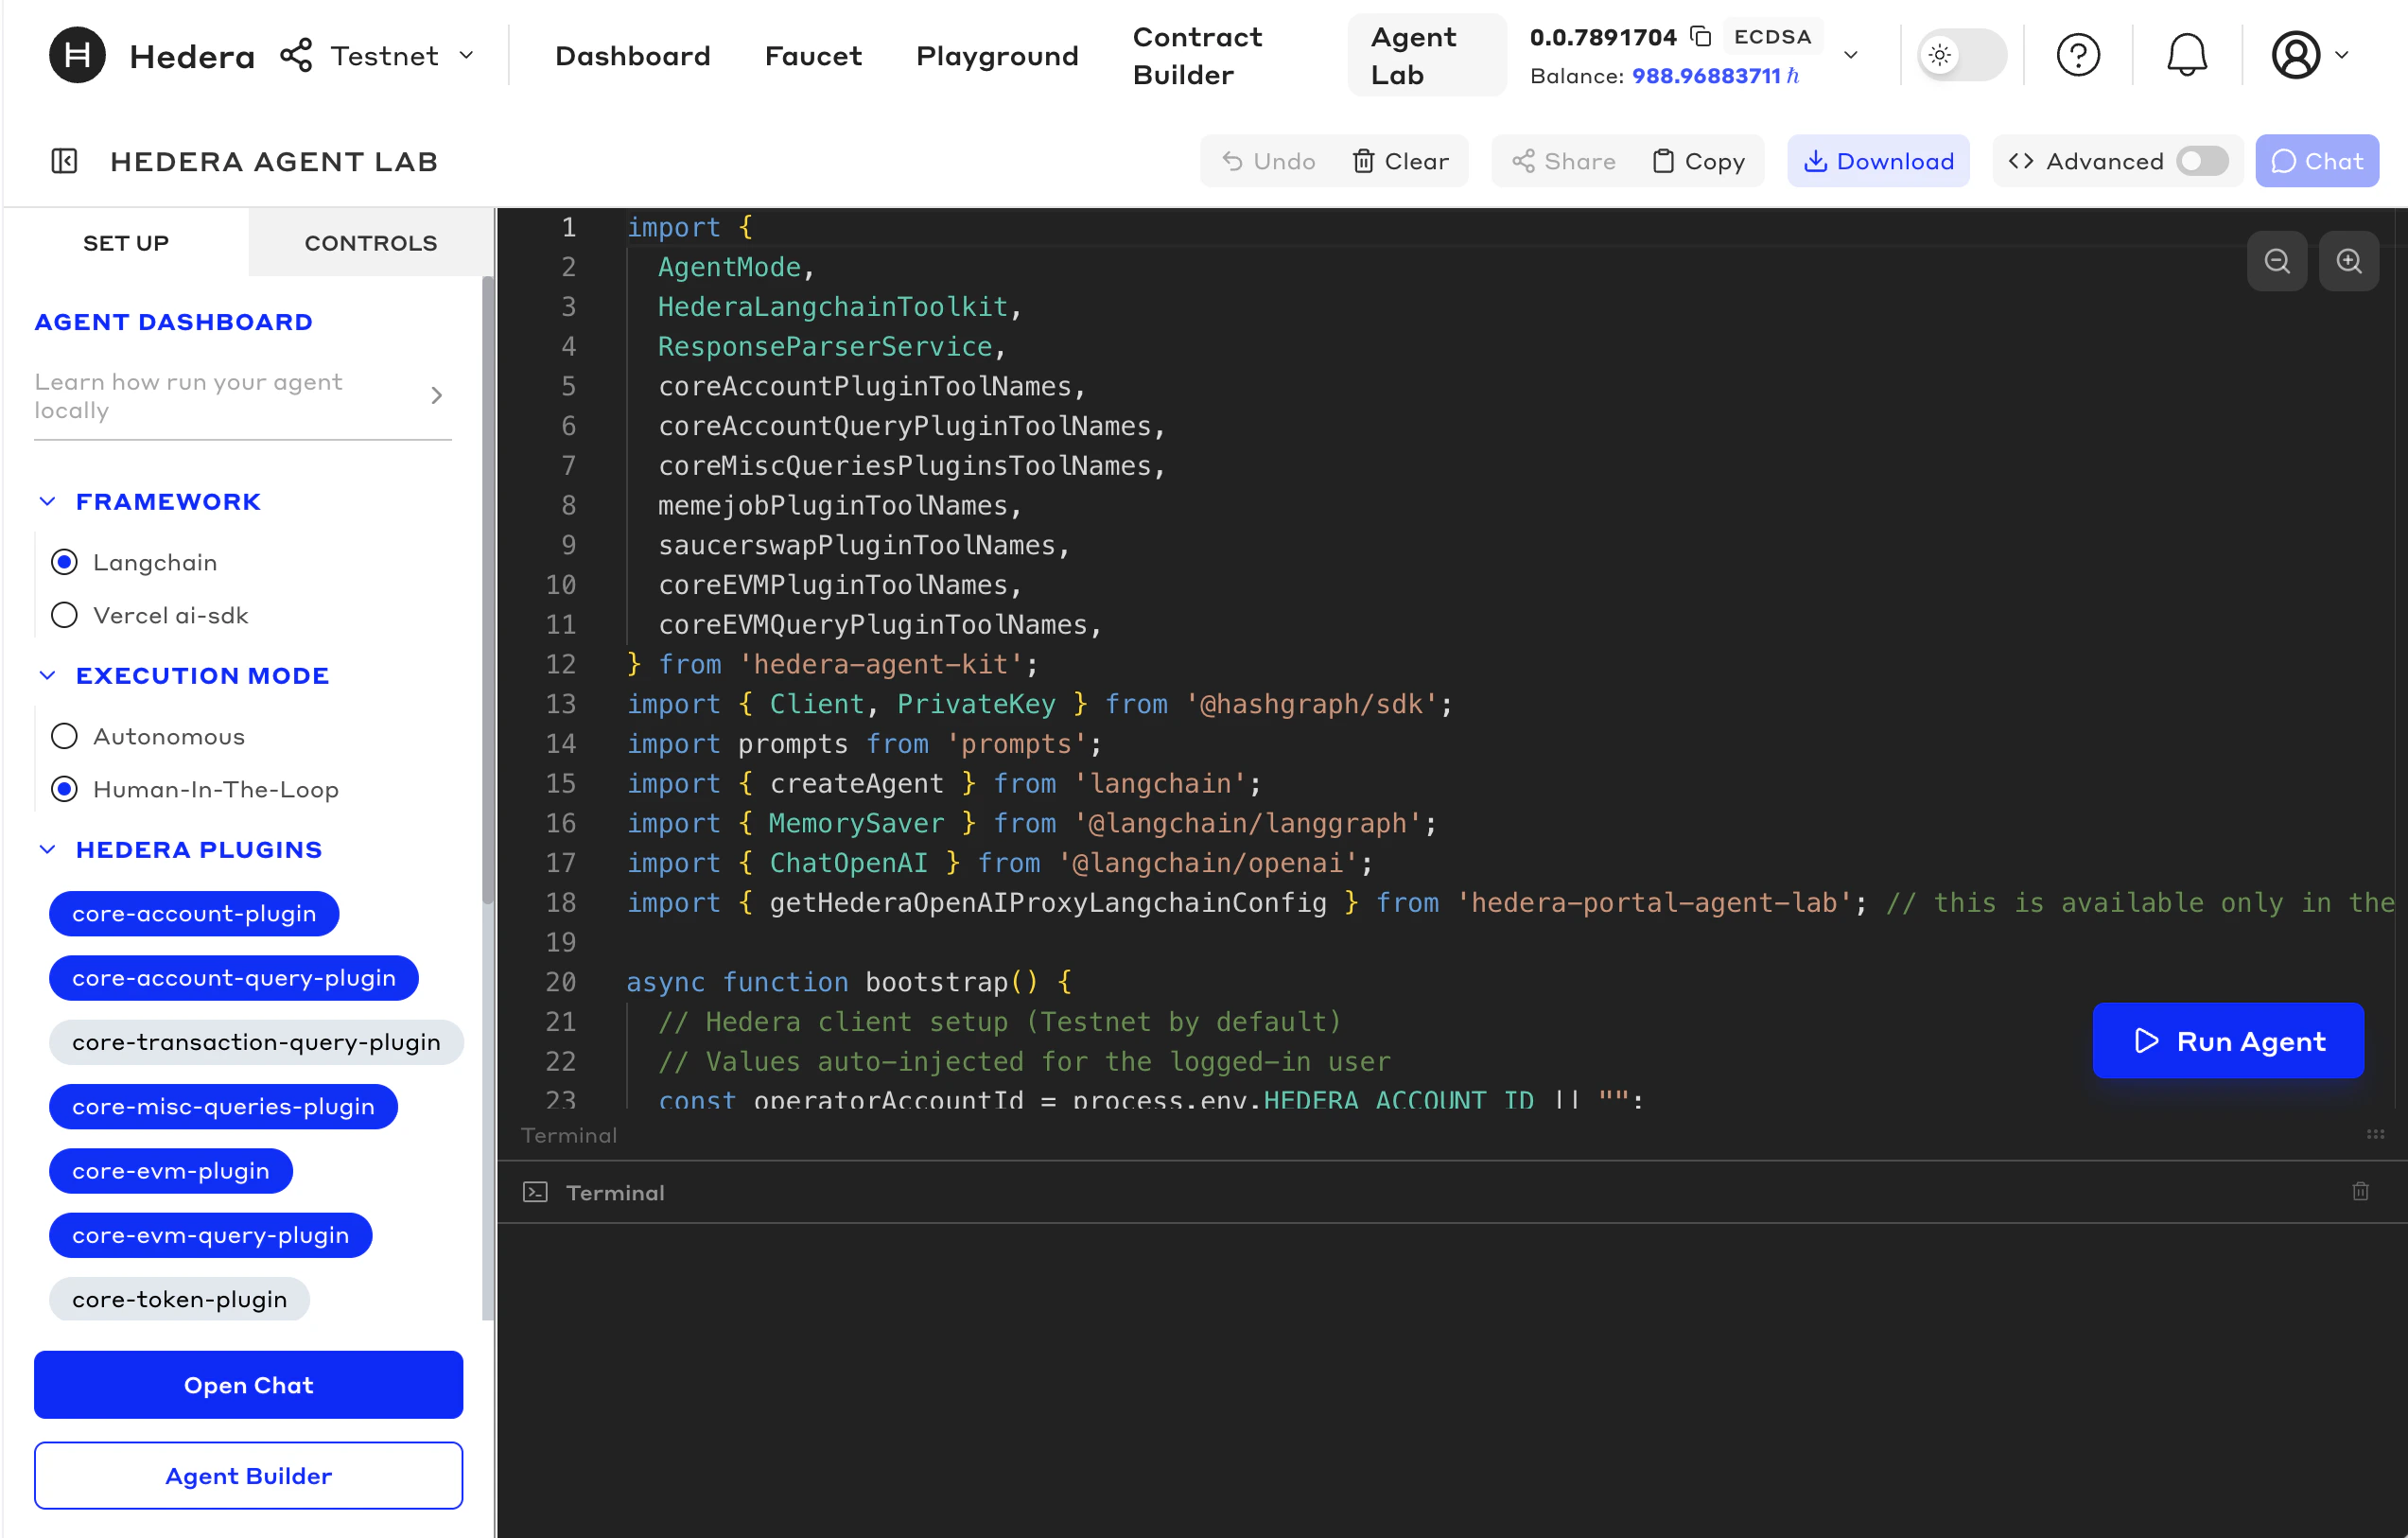
* Low-Code Mode provides **Agent Mode, Framework,** and **Plugin selection** buttons that enable you to choose and configure the basics for your Hedera Agent as the code is built for you.
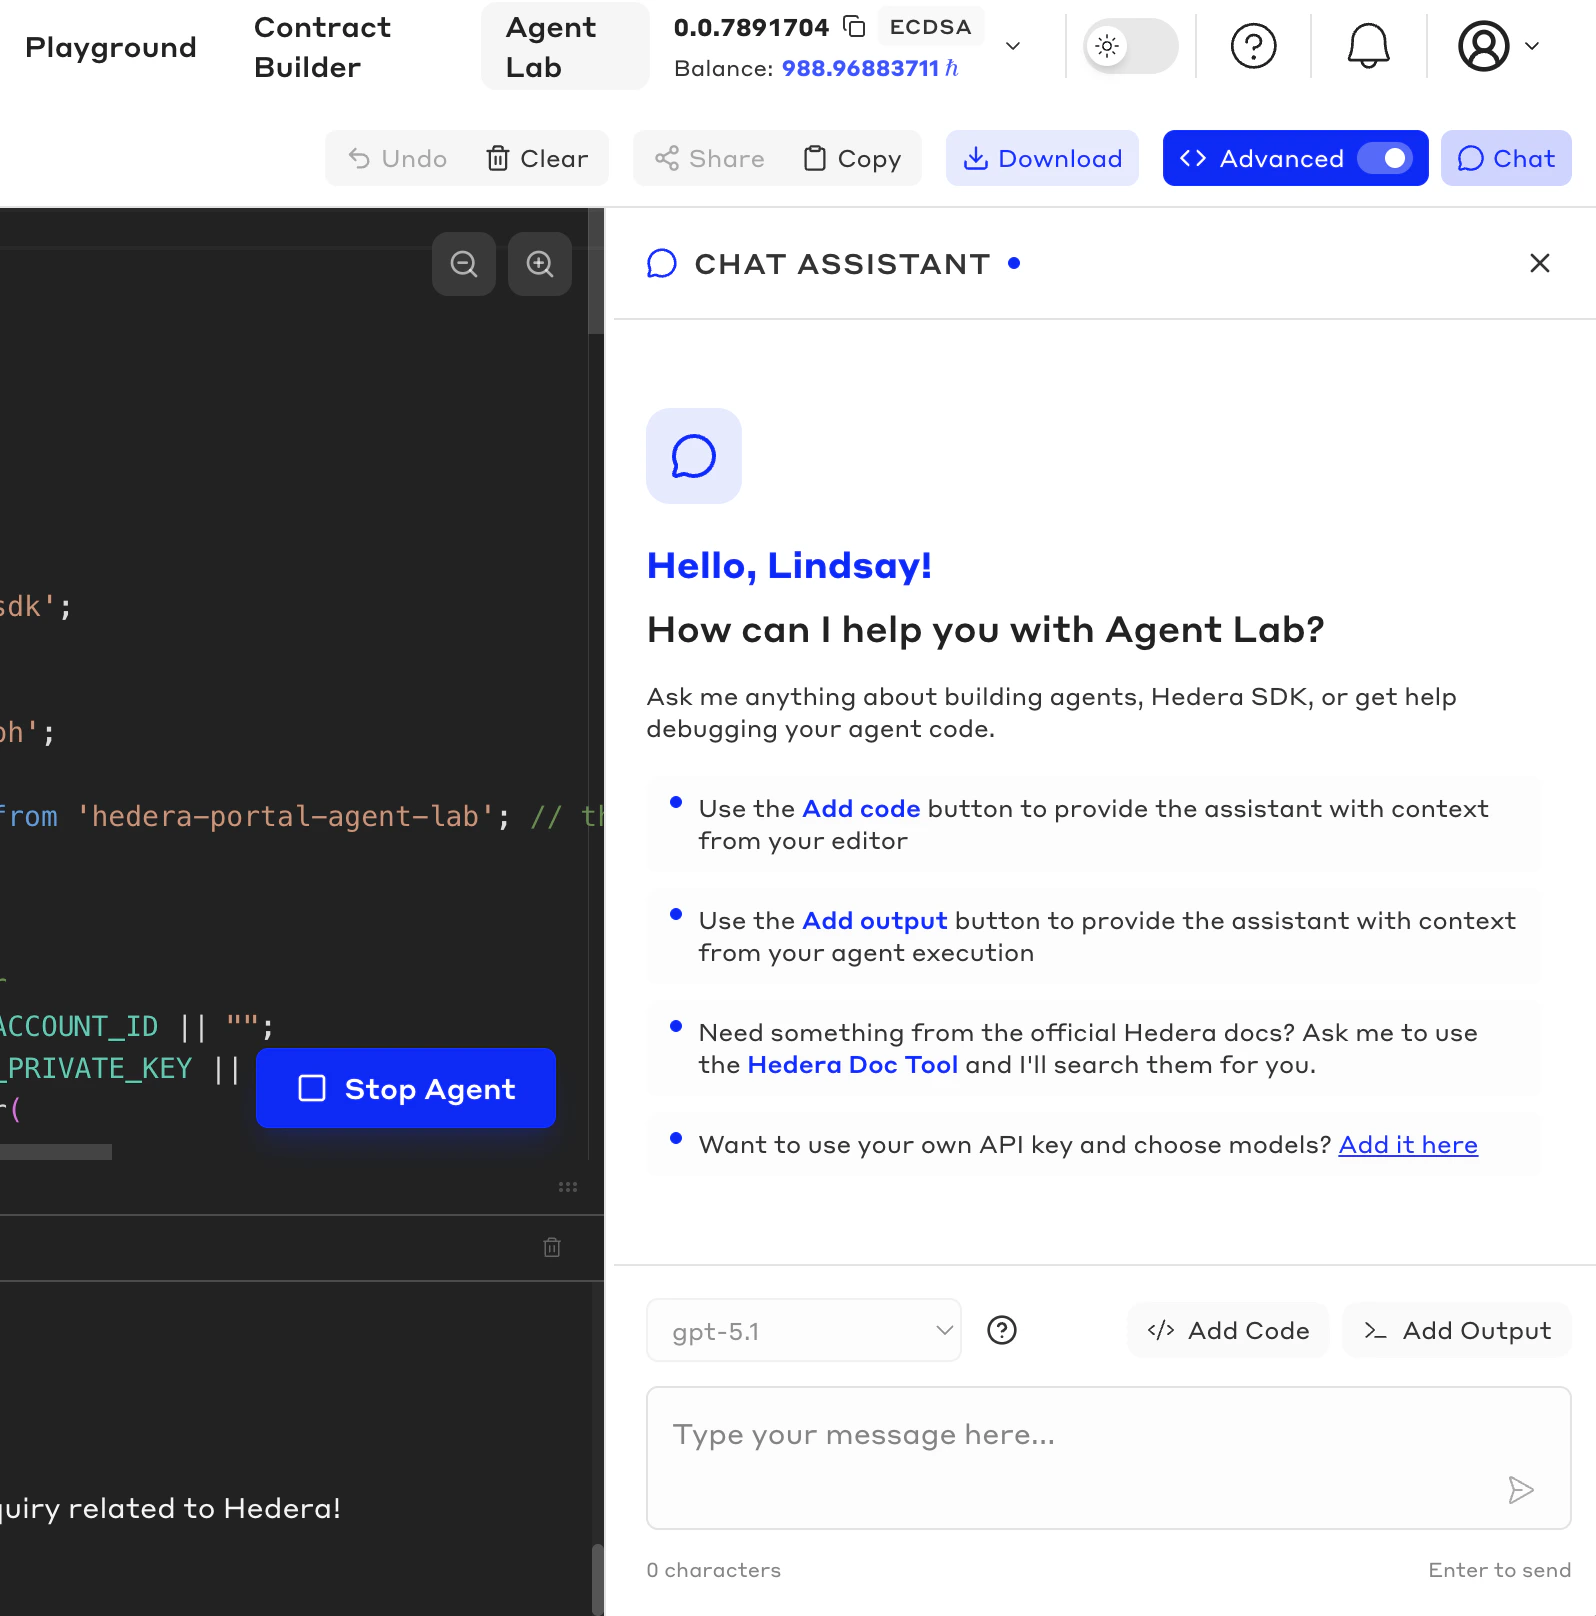
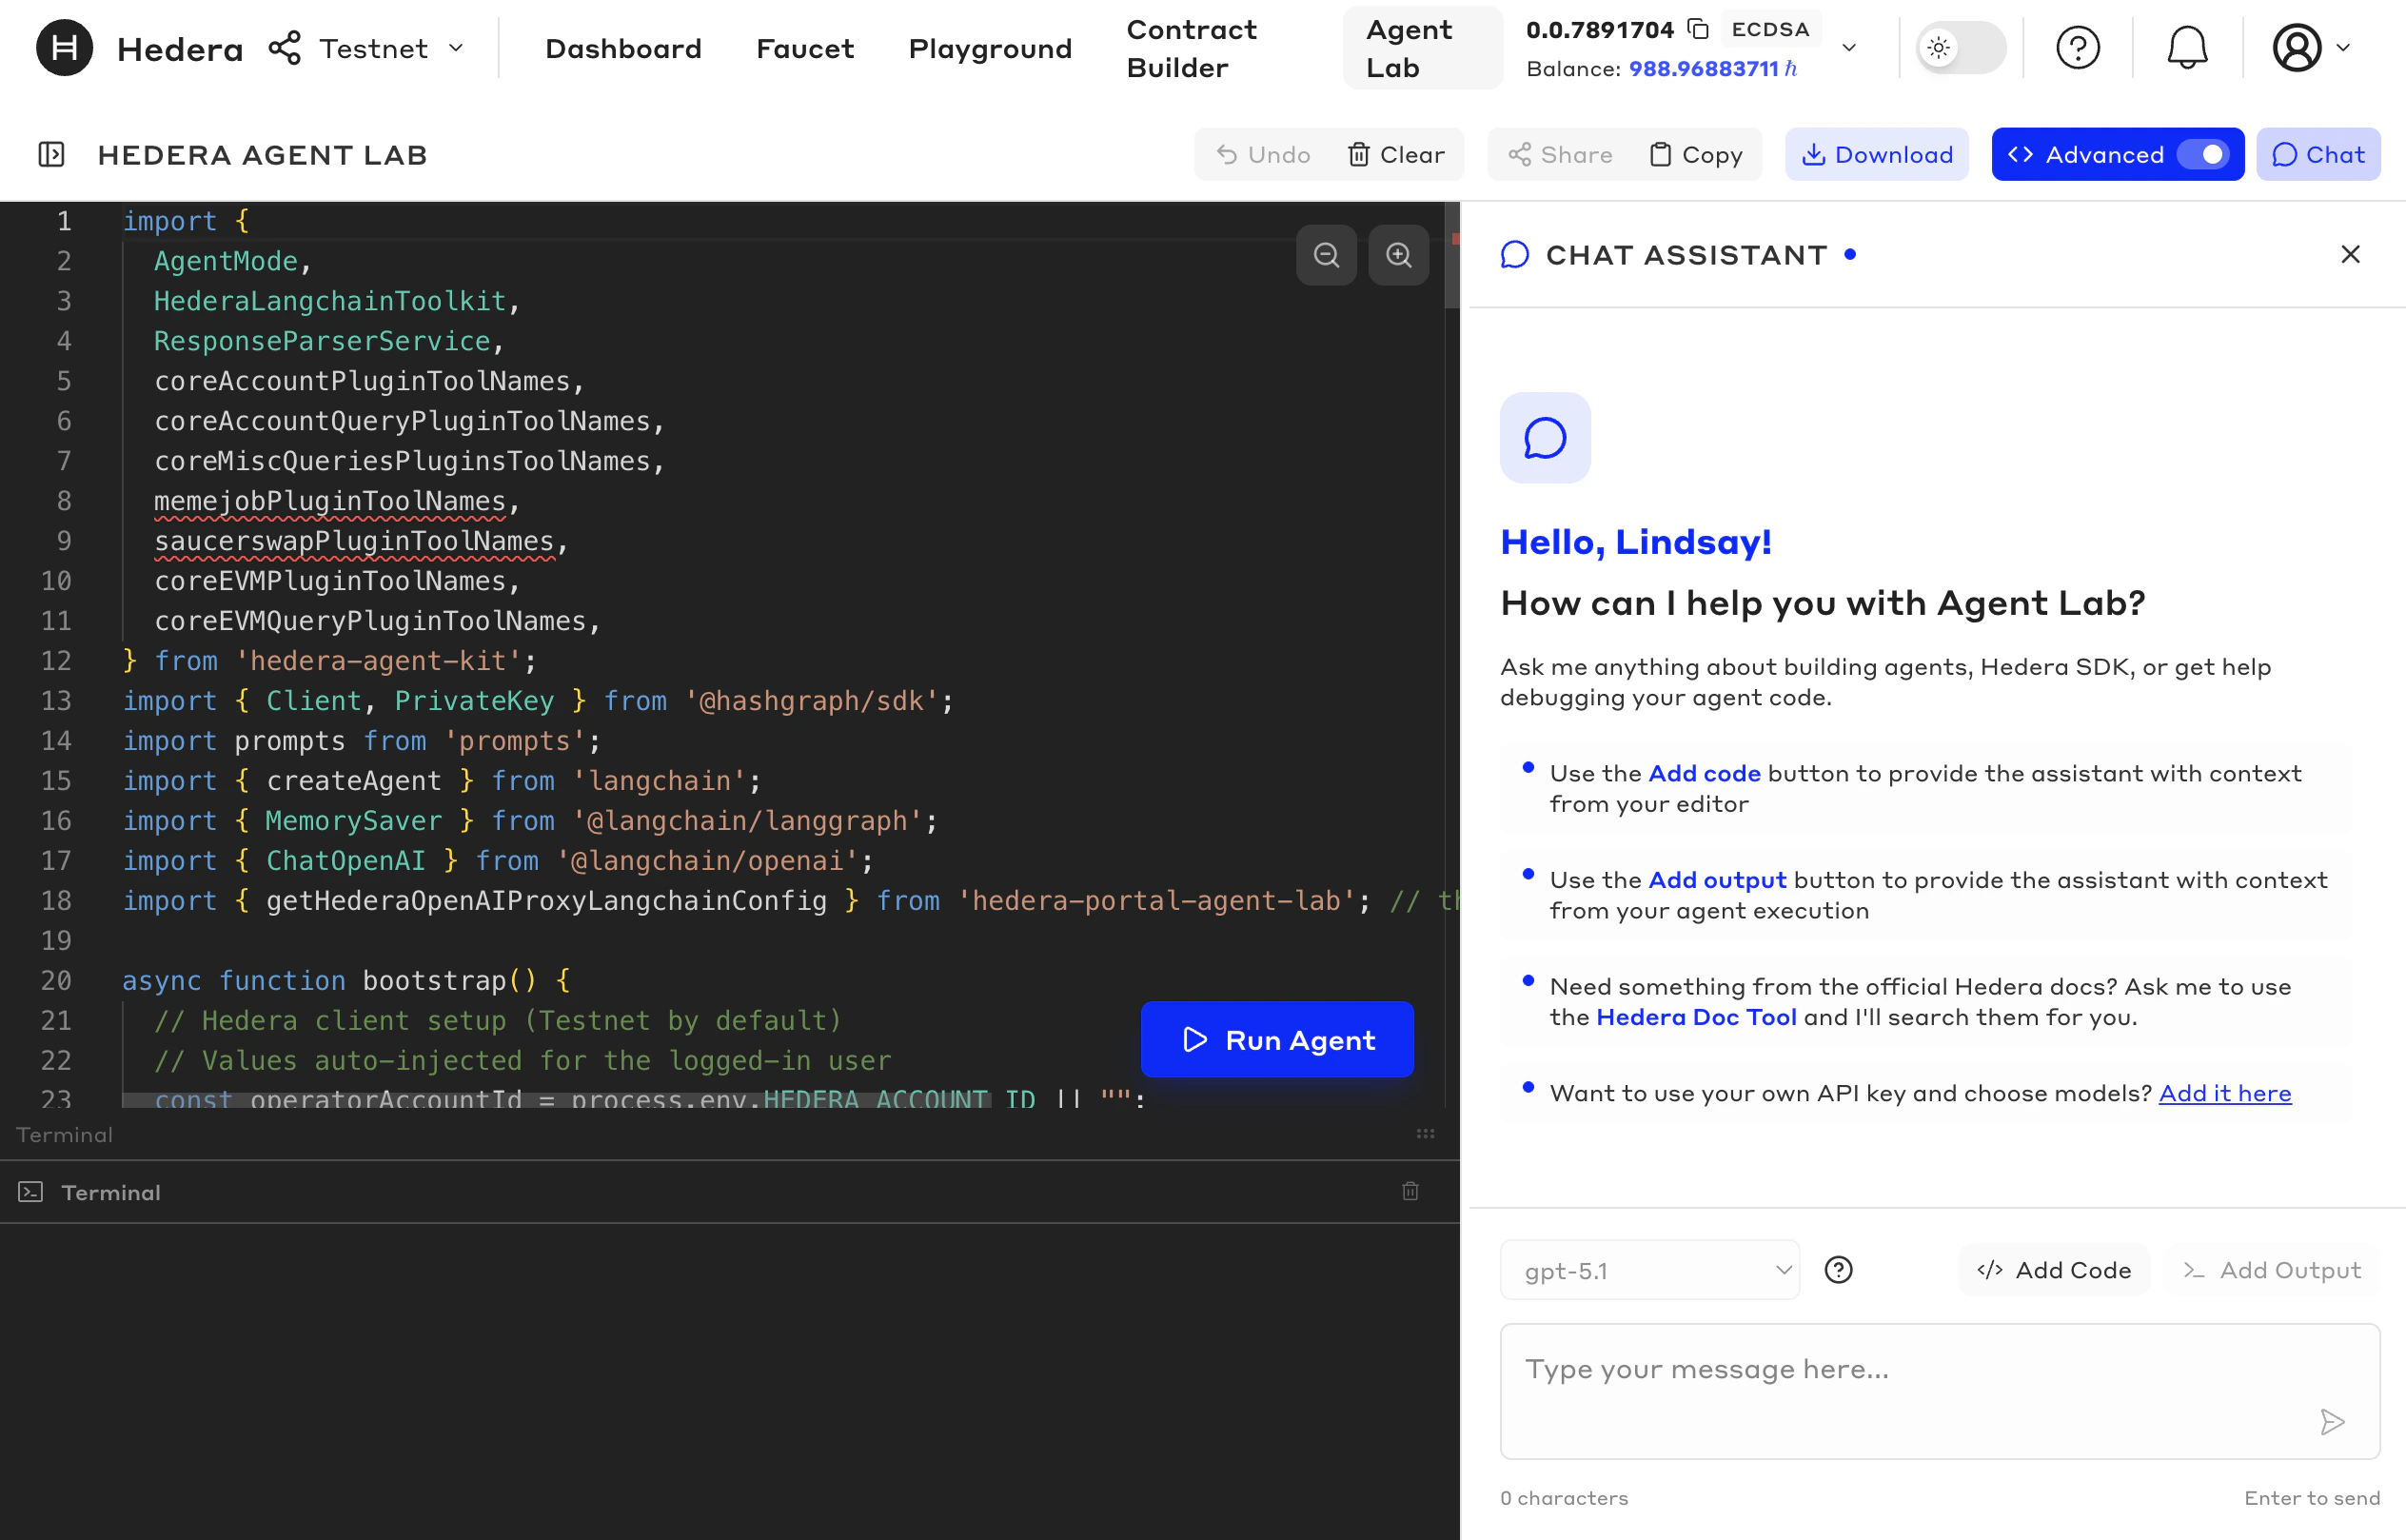
* The **Advanced Mode** toggle enables you to edit the code directly, with the help of an AI Assistant on the right-hand side.
* Run your agent in the terminal at the bottom of the screen, or interact with the **Run Agent** to get a preview of what your Hedera Agent will look like for end users.
Agent Lab provides a guided path from no-code experimentation to exporting your agent code, enabling developers to prototype quickly and providing a working starting point they can customize and deploy.
The tool provides different ways to build and interact with the agent:
* Use the **Agent Builder** to configure your agent with no code.
* Low-Code Mode provides **Agent Mode, Framework,** and **Plugin selection** buttons that enable you to choose and configure the basics for your Hedera Agent as the code is built for you.
* The **Advanced Mode** toggle enables you to edit the code directly, with the help of an AI Assistant on the right-hand side.
* Run your agent in the terminal at the bottom of the screen, or interact with the **Run Agent** to get a preview of what your Hedera Agent will look like for end users.
 ## The Three-Step Workflow
Agent Lab organizes agent development into three sequential steps: **Build → Code → Run**.
| Step | Description |
| --------- | ------------------------------------------------------------------------------------------------------------------------------------- |
| **Build** | No-code wizard to configure your agent type, framework, and behavior mode |
| **Code** | Interactive low-code editor to inspect, extend, and customize the generated agent code by selecting your framework, mode, and plugins |
| **Run** | Chat interface for executing your agent against Hedera Testnet |
You can move between these steps at any time. Clicking **Open Chat** from the code view opens the Run interface; clicking **Close Builder** returns you to the code.
## Quickstart
You can start directly with agent code by visiting the [Hedera Portal](https://portal.hedera.com/agent-lab) and clicking on the **Agent Lab** tab, or use the button at the top of the page to start with the **Agent Builder**.
## The Three-Step Workflow
Agent Lab organizes agent development into three sequential steps: **Build → Code → Run**.
| Step | Description |
| --------- | ------------------------------------------------------------------------------------------------------------------------------------- |
| **Build** | No-code wizard to configure your agent type, framework, and behavior mode |
| **Code** | Interactive low-code editor to inspect, extend, and customize the generated agent code by selecting your framework, mode, and plugins |
| **Run** | Chat interface for executing your agent against Hedera Testnet |
You can move between these steps at any time. Clicking **Open Chat** from the code view opens the Run interface; clicking **Close Builder** returns you to the code.
## Quickstart
You can start directly with agent code by visiting the [Hedera Portal](https://portal.hedera.com/agent-lab) and clicking on the **Agent Lab** tab, or use the button at the top of the page to start with the **Agent Builder**.
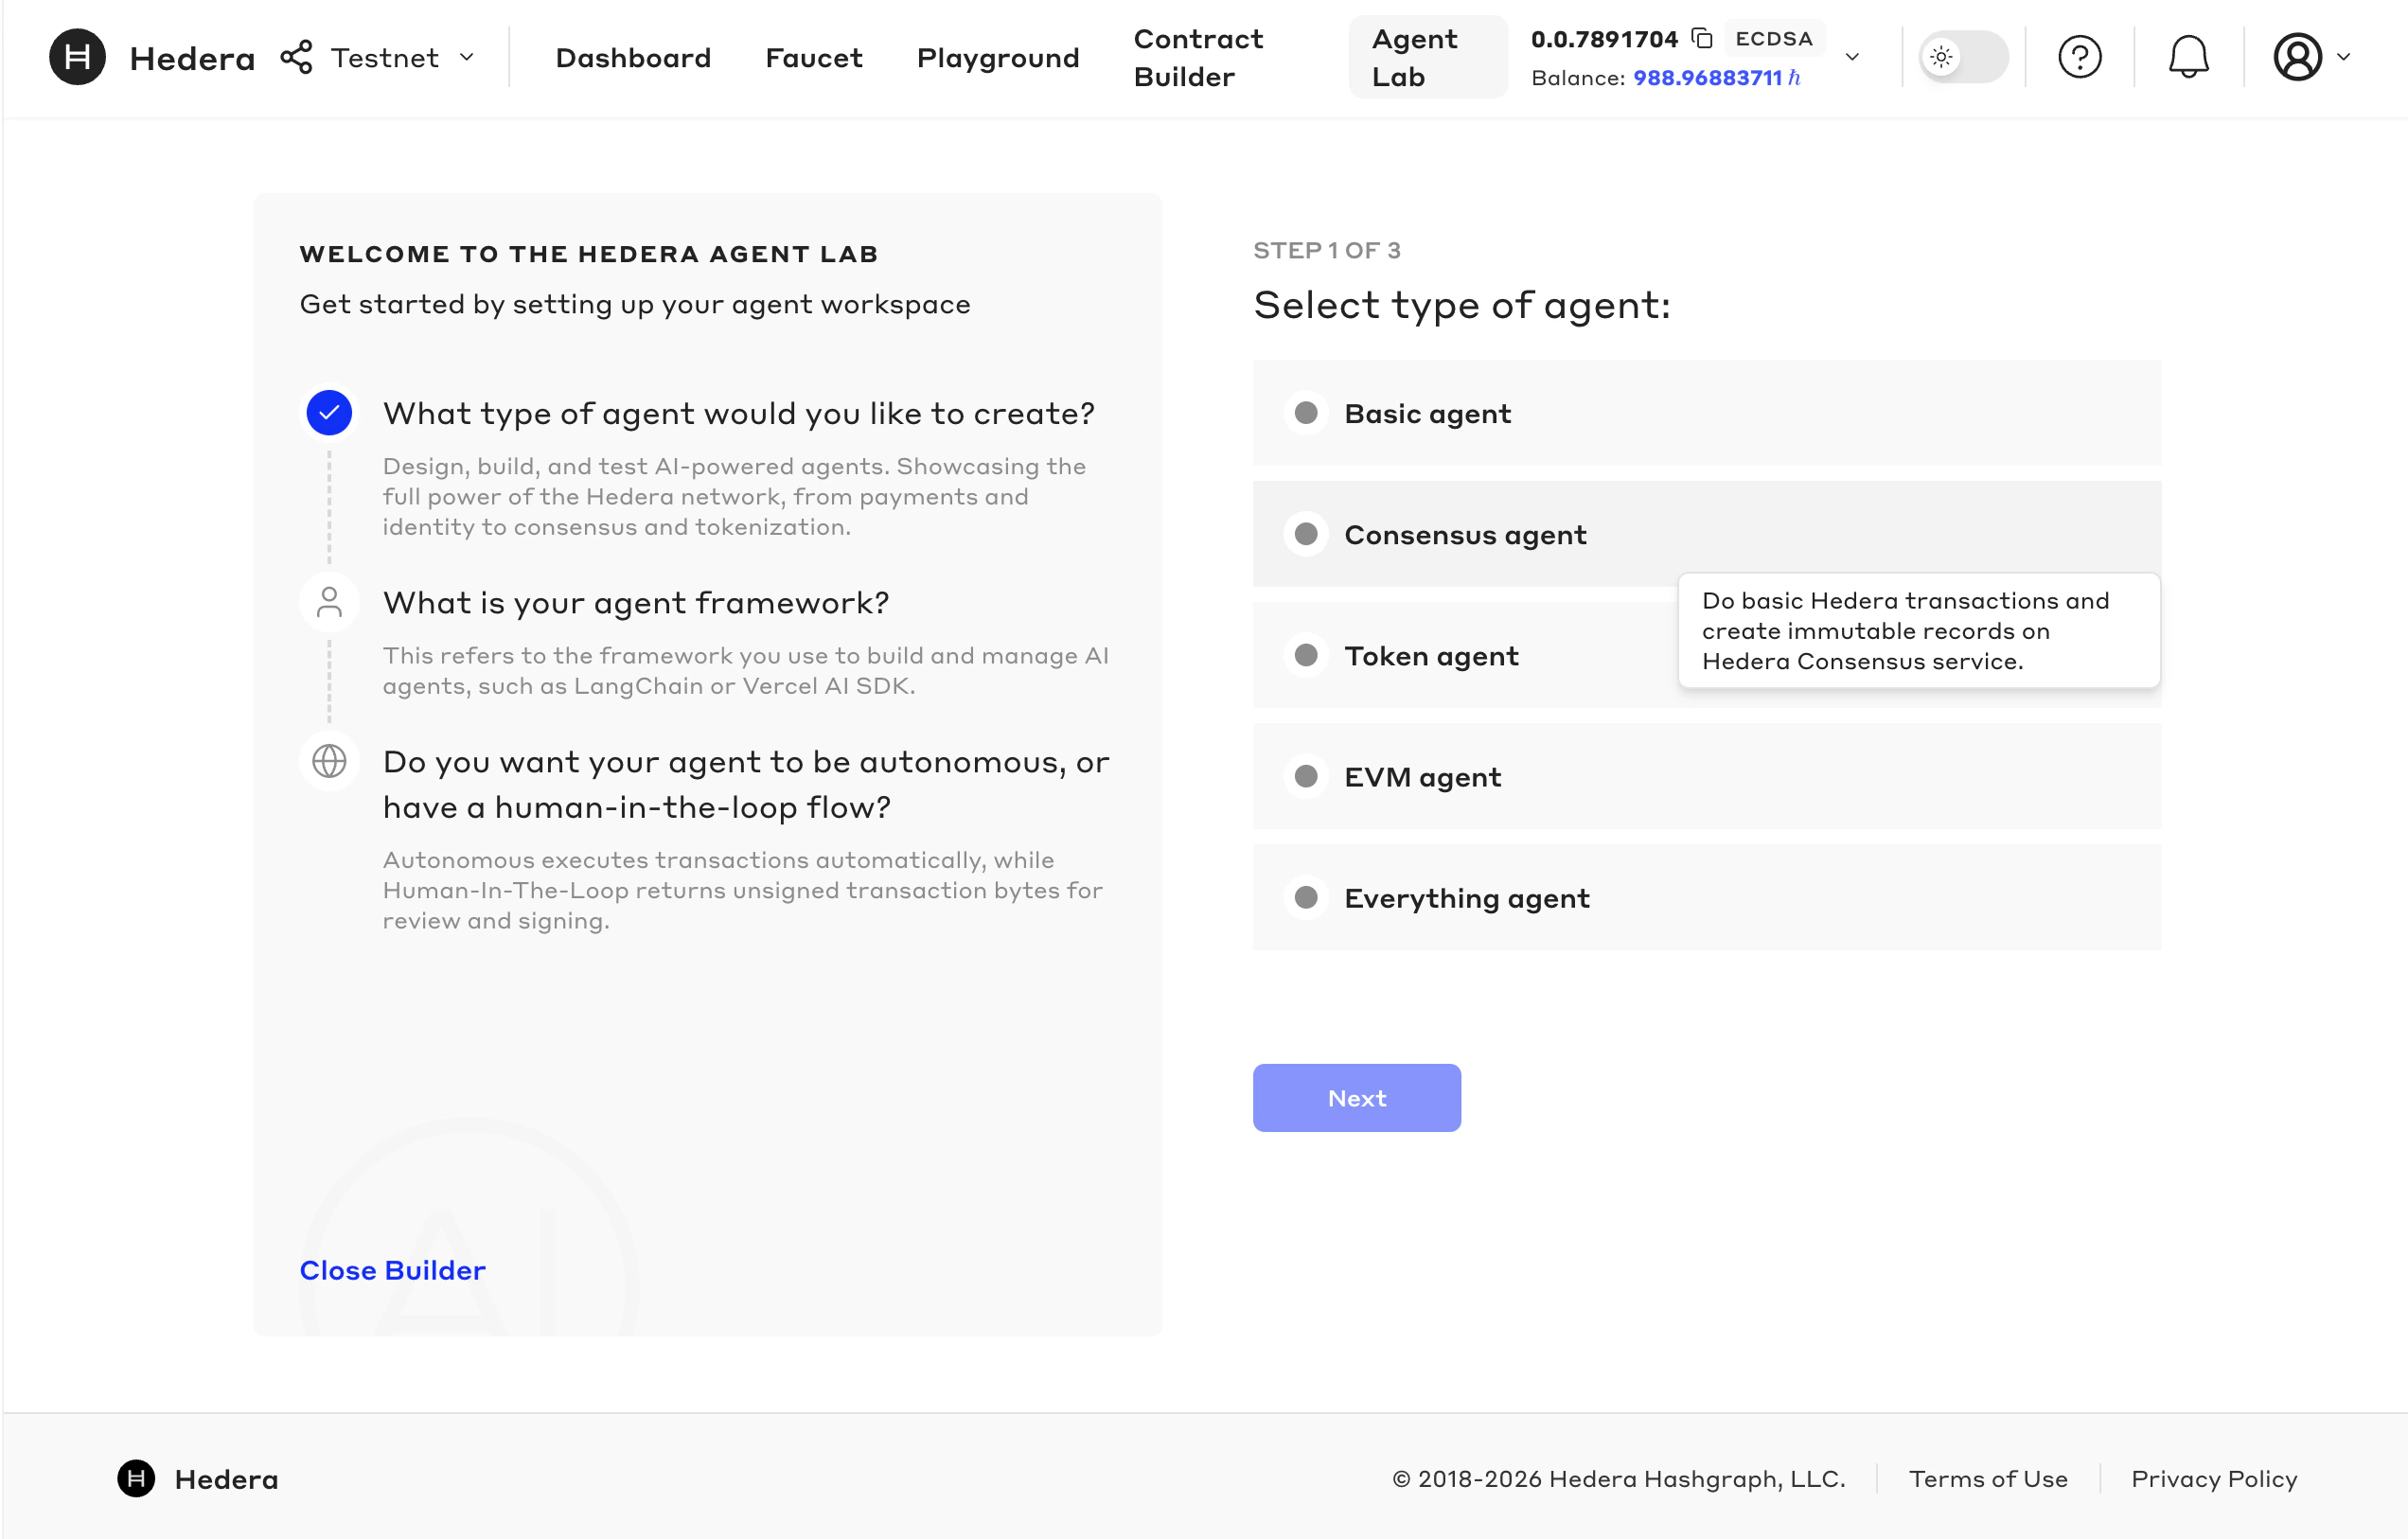 Here you can choose:
* **Agent Type** - Choose a basic template agent with different features and functionality
* **Framework** - Choose the framework you want to use for your agent to handle tools, execution, prompts & memory, and execution patterns.
* **Agent Mode** - Choose how your agent operates and interprets prompts *Autonomous Mode* or *Human-in-the-Loop Mode*. With human-in-the-loop mode, users will have to sign every transction before execution, and if you are building an agentic application, you will need to integrate with a wallet.
### Step 2: Code — The Code Editor
The code editor is the central workspace in Agent Lab. It opens automatically after the wizard, or directly when you click the **Agent Lab** tab.
Within the code editor, you can build your agent in different ways, chat with your agent when you run it in the terminal below, switch to Advanced Mode, switch to Chat and Agent Builder views, and Download your agent code.
Here you can choose:
* **Agent Type** - Choose a basic template agent with different features and functionality
* **Framework** - Choose the framework you want to use for your agent to handle tools, execution, prompts & memory, and execution patterns.
* **Agent Mode** - Choose how your agent operates and interprets prompts *Autonomous Mode* or *Human-in-the-Loop Mode*. With human-in-the-loop mode, users will have to sign every transction before execution, and if you are building an agentic application, you will need to integrate with a wallet.
### Step 2: Code — The Code Editor
The code editor is the central workspace in Agent Lab. It opens automatically after the wizard, or directly when you click the **Agent Lab** tab.
Within the code editor, you can build your agent in different ways, chat with your agent when you run it in the terminal below, switch to Advanced Mode, switch to Chat and Agent Builder views, and Download your agent code.
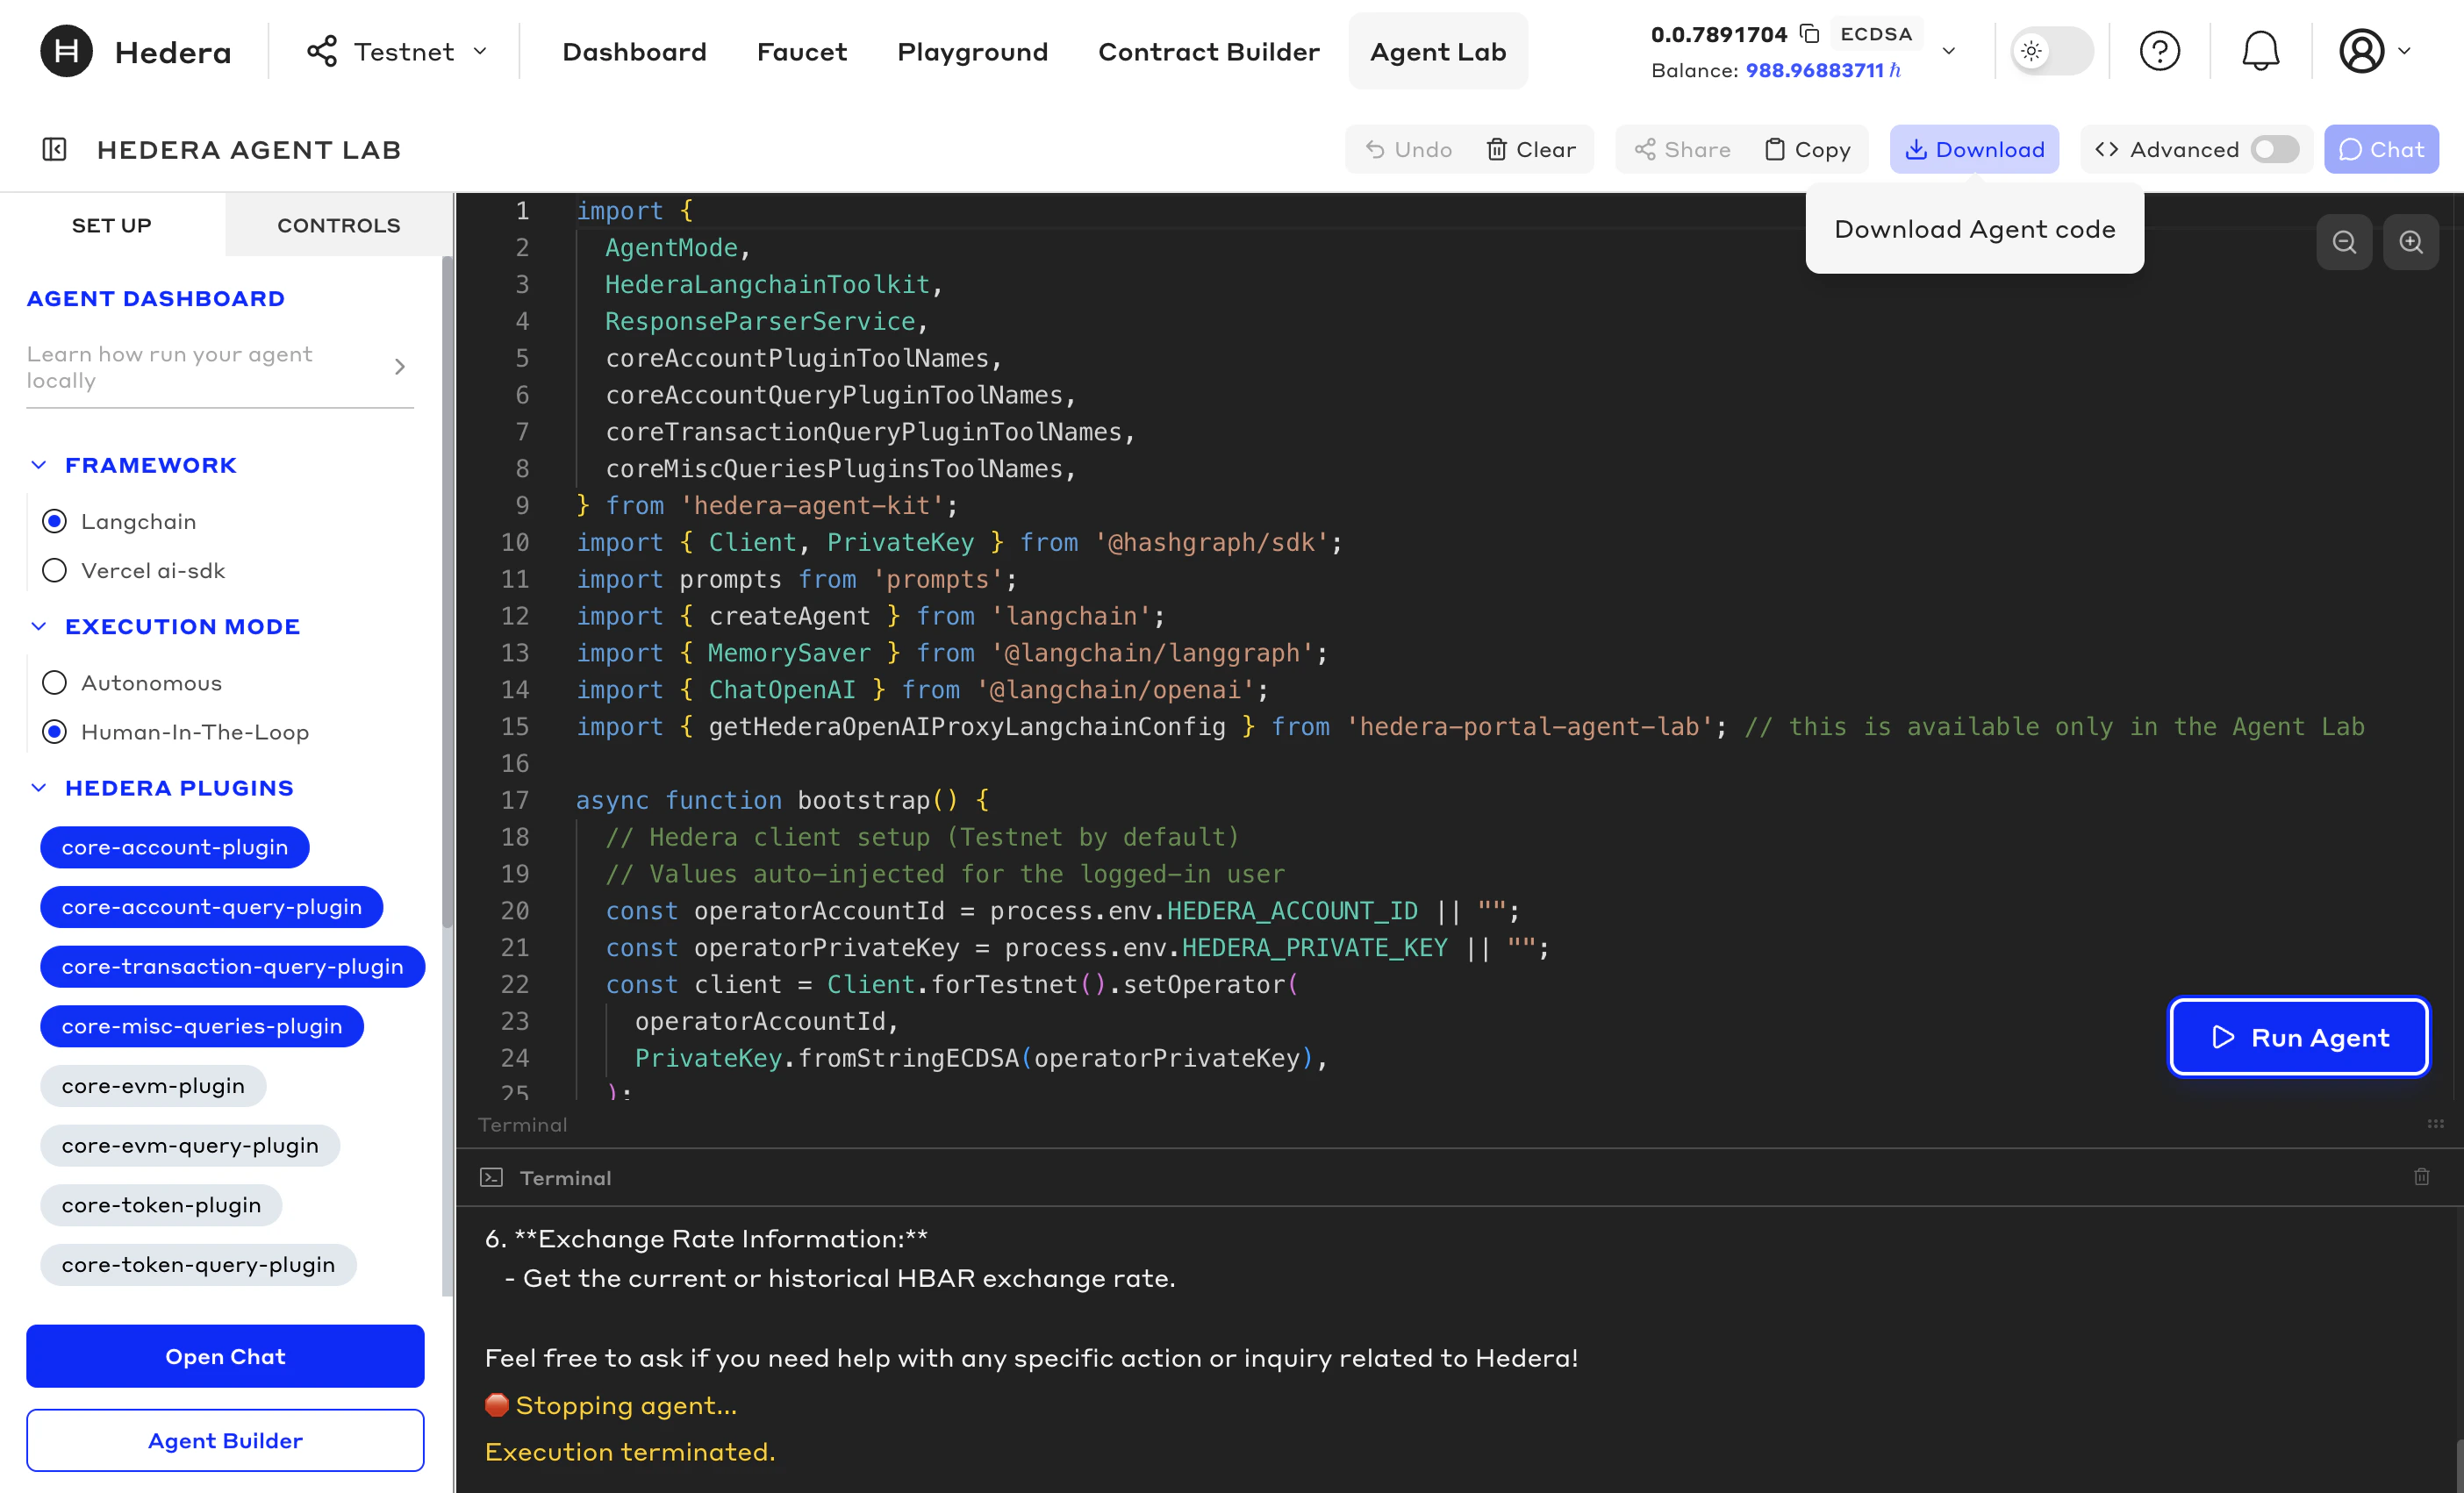 The code editor has three panels:
* **Left sidebar** — Toggle plugins, frameworks, and agent controls
* **Center panel** — The Monaco-based code editor (the same engine that powers VS Code) showing your generated TypeScript agent code
* **Right panel** — The AI coding assistant (available in Advanced Mode)
Below the center panel is a **Terminal** showing the agent chat, compilation results and agent runtime logs.
#### Block Mode and Advanced Mode
By default, the editor opens in **Block Mode**. You can switch to **Advanced Mode** using the toggle in the toolbar.
The code editor has three panels:
* **Left sidebar** — Toggle plugins, frameworks, and agent controls
* **Center panel** — The Monaco-based code editor (the same engine that powers VS Code) showing your generated TypeScript agent code
* **Right panel** — The AI coding assistant (available in Advanced Mode)
Below the center panel is a **Terminal** showing the agent chat, compilation results and agent runtime logs.
#### Block Mode and Advanced Mode
By default, the editor opens in **Block Mode**. You can switch to **Advanced Mode** using the toggle in the toolbar.
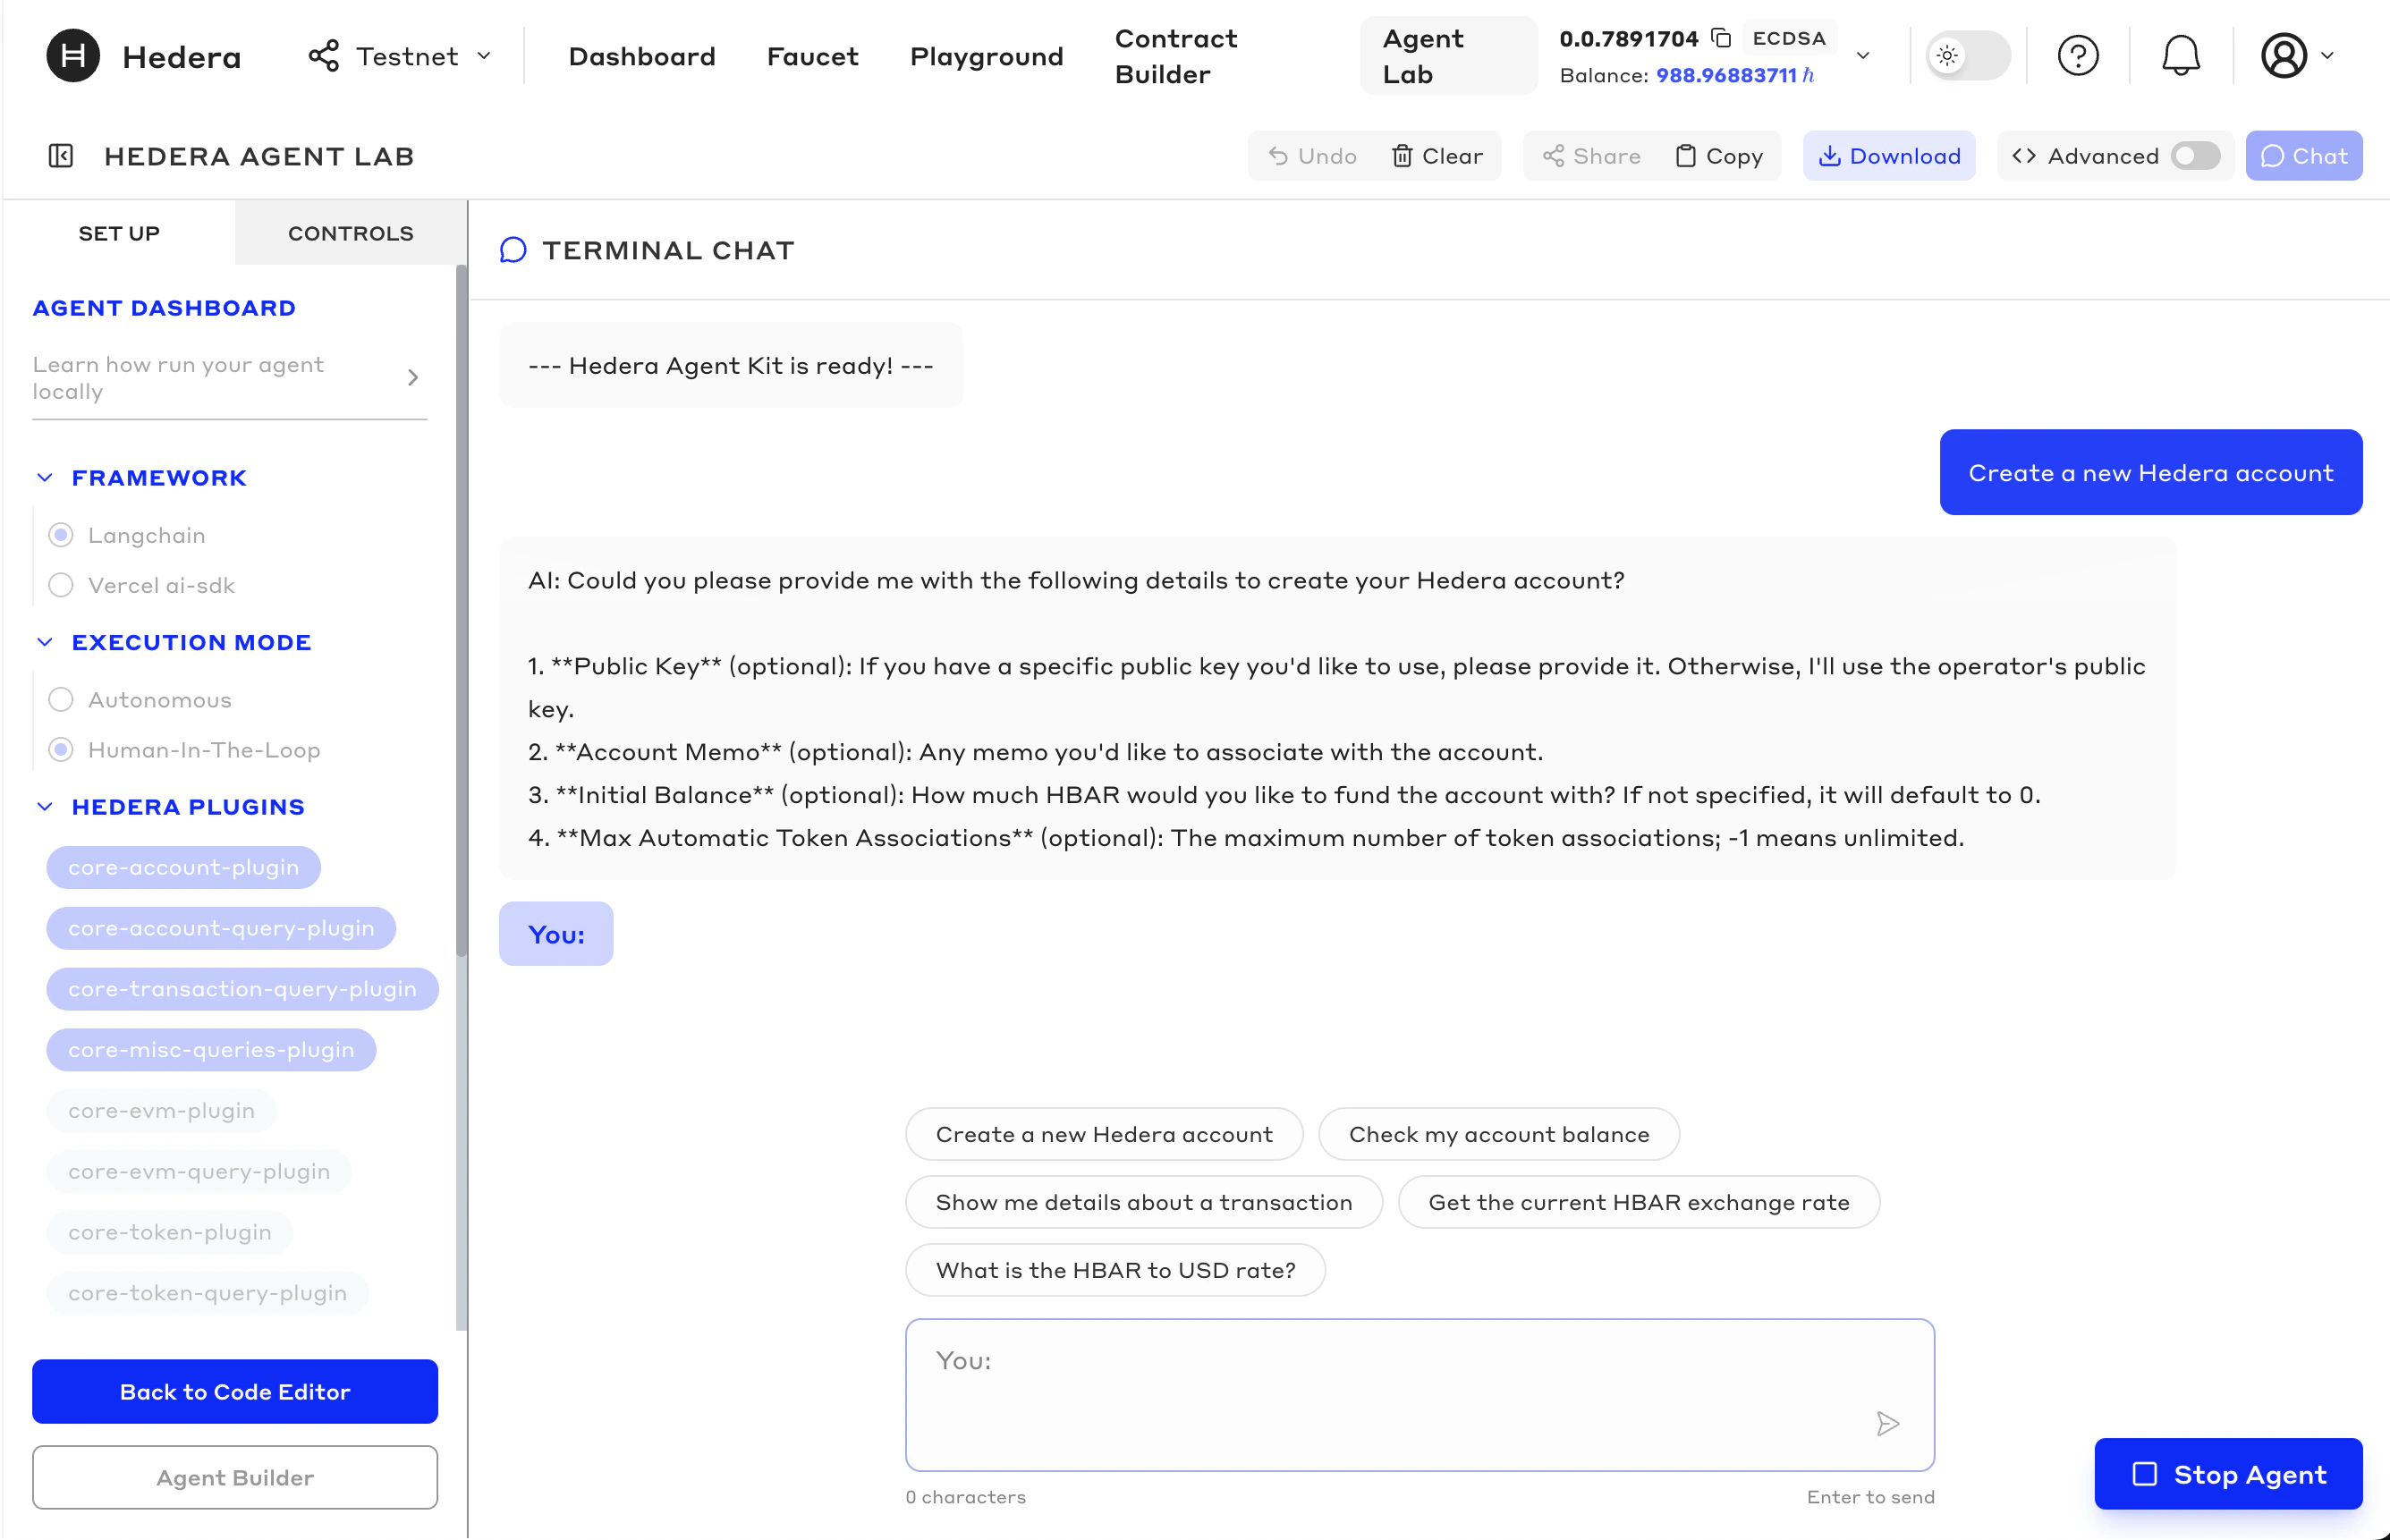 The agent processes your request and executes the corresponding Hedera operations using the plugins configured in your agent. Response messages appear in the chat, reflecting the agent's tool calls and results.
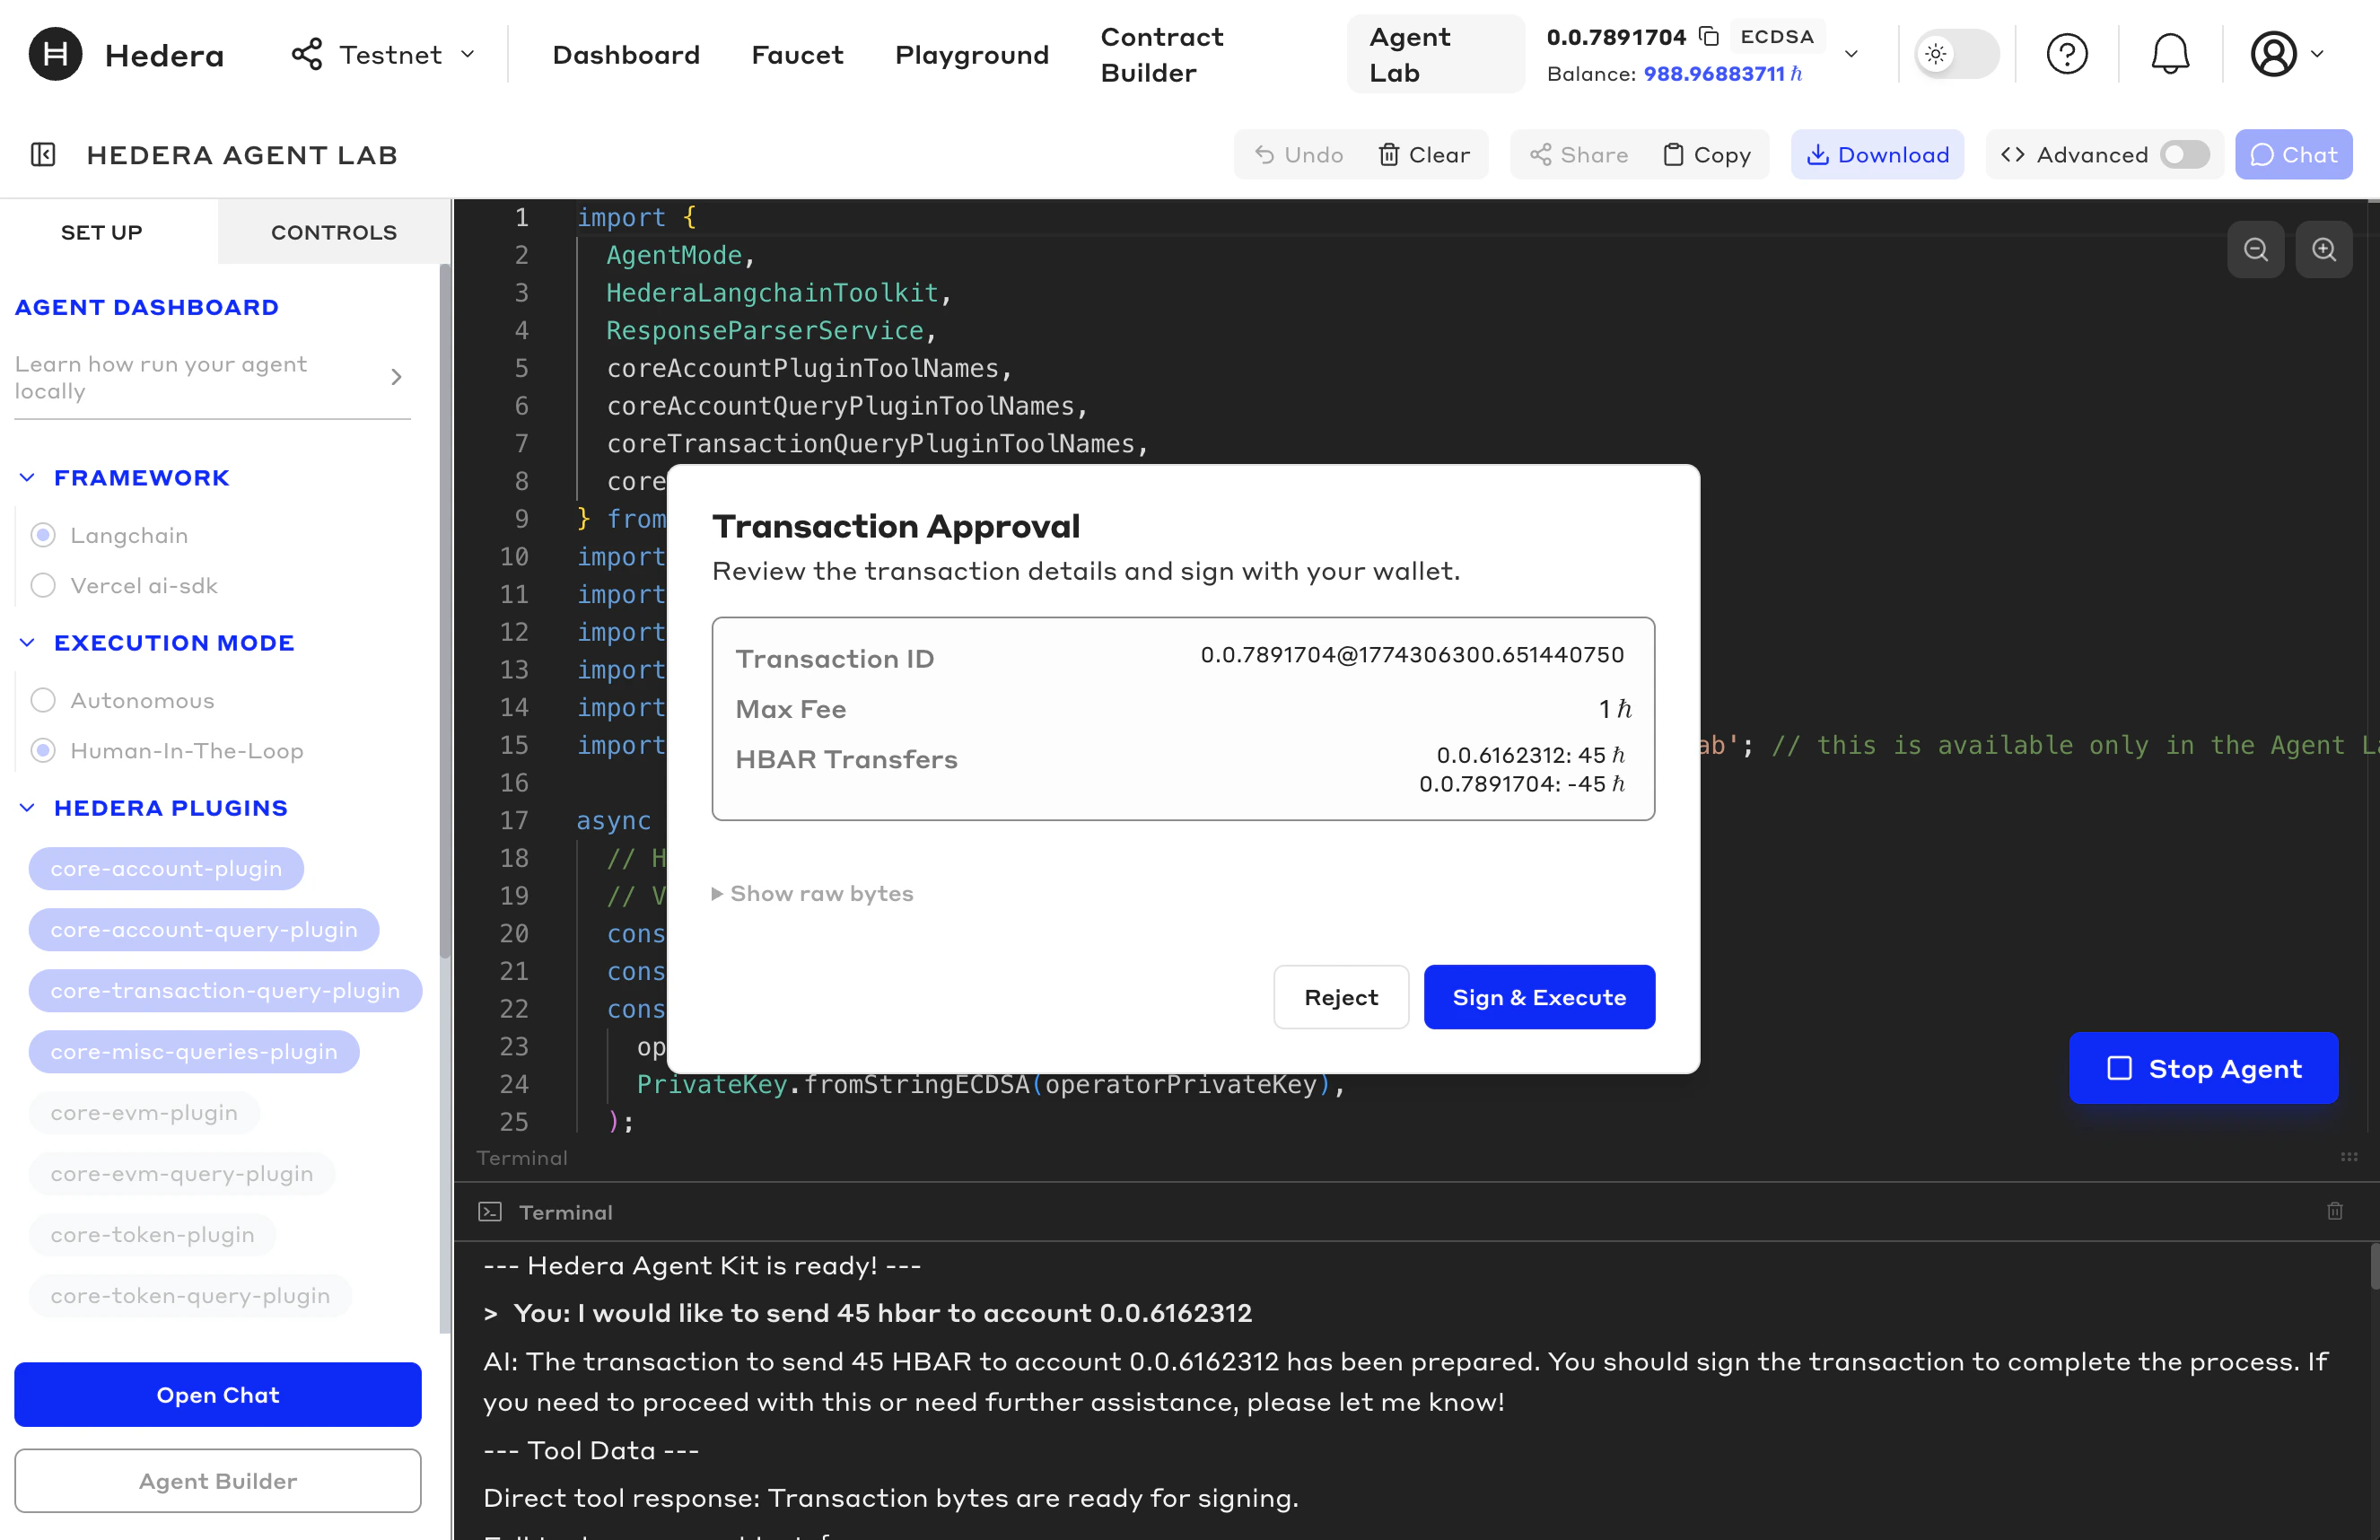
#### Transaction Approval (Human-In-The-Loop Mode)
If your agent was configured in **Human-In-The-Loop** mode, transactions are returned as unsigned bytes rather than executed automatically. A **Transaction Approval** modal will appear showing:
* Transaction ID
* Transaction type and details (e.g., recipient, amount, memo)
* Max fee
* Raw bytes (expandable)
You can **Sign & Execute** to submit the transaction using your Developer Portal account credentials, or **Reject** to cancel it. Successful transactions display a link to [HashScan](https://hashscan.io) for verification.
The agent processes your request and executes the corresponding Hedera operations using the plugins configured in your agent. Response messages appear in the chat, reflecting the agent's tool calls and results.
#### Transaction Approval (Human-In-The-Loop Mode)
If your agent was configured in **Human-In-The-Loop** mode, transactions are returned as unsigned bytes rather than executed automatically. A **Transaction Approval** modal will appear showing:
* Transaction ID
* Transaction type and details (e.g., recipient, amount, memo)
* Max fee
* Raw bytes (expandable)
You can **Sign & Execute** to submit the transaction using your Developer Portal account credentials, or **Reject** to cancel it. Successful transactions display a link to [HashScan](https://hashscan.io) for verification.
 ### Step 4: Download and Test Your Agent
Once you are done prototyping, you can export your agent code to test it locally or integrate it into your own applications.
When you're ready to test your agent locally, click the **Download** button in the top right corner of the chat interface.
### Step 4: Download and Test Your Agent
Once you are done prototyping, you can export your agent code to test it locally or integrate it into your own applications.
When you're ready to test your agent locally, click the **Download** button in the top right corner of the chat interface.
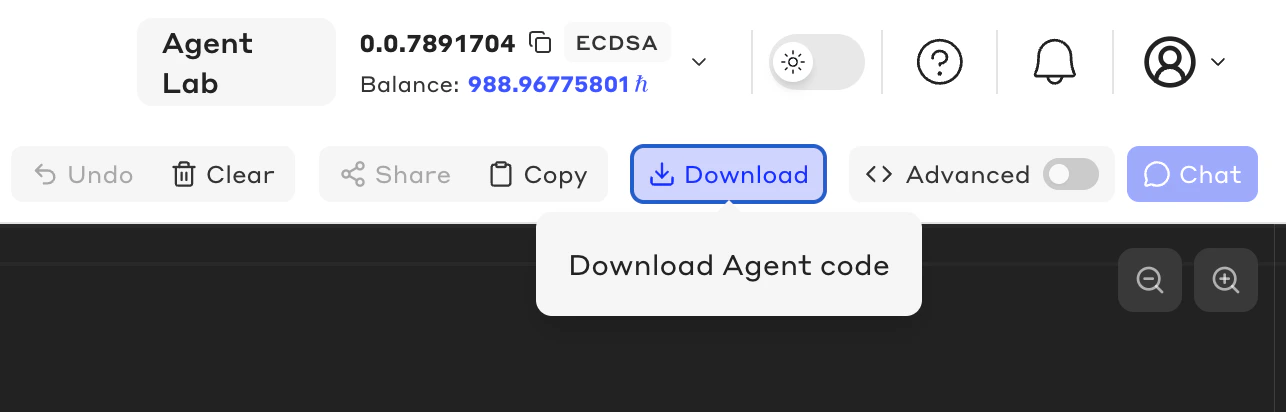 This will download a zip file containing your agent code and dependencies. Simply run `npm install` and `npm start` to test your agent locally.
The README file in the downloaded package provides detailed instructions, and even provides information if you choose to try your agent out on Mainnet.
This will download a zip file containing your agent code and dependencies. Simply run `npm install` and `npm start` to test your agent locally.
The README file in the downloaded package provides detailed instructions, and even provides information if you choose to try your agent out on Mainnet.