Not sure whether to use the Hiero Local Node, Hashio, or a custom relay setup?
Read this blog
post
comparing the different options.
You can take a look at the complete code in the Hedera-Code-Snippets
repository.
Prerequisites
- Basic understanding of smart contracts.
- Basic understanding of Node.js and JavaScript/TypeScript.
- Have nodejs installed on your local machine.
- Basic understanding of Hardhat EVM Development Tool and Ethers.
- ECDSA account from the Hedera Portal.
Video Tutorial
You can watch the video tutorial (which uses Hardhat version 2) or follow the step-by-step tutorial below (which uses Hardhat version 3).🚧 What's new: Hardhat 2 → 3
🚧 What's new: Hardhat 2 → 3
Key differences in Hardhat 3:
- compile → build
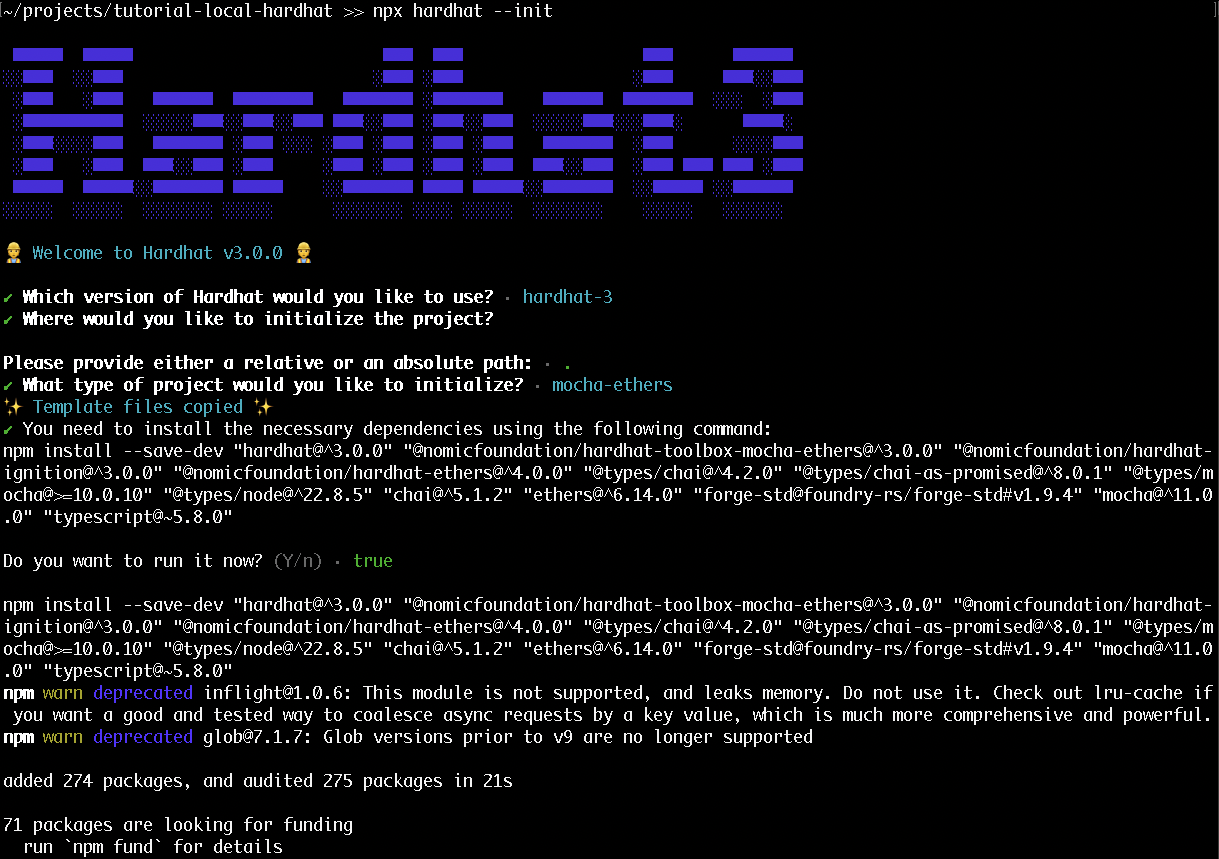
npx hardhat compileis nownpx hardhat build. This is the big one. The v3 migration guide explicitly shows using thebuildtask. - project init switch
v2 commonly usednpx hardhatornpx hardhat initto bootstrap. In v3 it’snpx hardhat --init.
- keystore helper commands are new
v3’s recommended flow includes a keystore plugin with commands likenpx hardhat keystore set HEDERA_RPC_URLandnpx hardhat keystore set HEDERA_PRIVATE_KEY. These weren’t standard in v2. - Foundry-compatiable Solidity tests
In addition to offering Javascript/Typescript integration tests, Hardhat v3 also integrates Foundry-compatible Solidity tests that allows developers to write unit tests directly in Solidity
- Enhanced Network Management
v3 allows tasks to create and manage multiple network connections simultaneously which is a significant improvement over the single, fixed connection available in version 2. This provides greater flexibility for scripts and tests that interact with multiple networks.
Step 1: Set Up the Hiero Local Node
Hedera provides a local node configuration that includes a mirror node, a consensus node, and the JSON-RPC relay. You can run it vianpm.
If you are use Testnet instead of a local node, you can skip this step.
hardhat.config.ts.
Step 2: Create a Hardhat Project
If you don’t already have a Hardhat project, create one:hardhat and @nomicfoundation/hardhat-ethers (This includes plugins for Ethers, Mocha, Chai, and more).
Project Structure
The Hardhat project initialization from the previous section creates the following file structure:hardhat.config.ts: The main configuration file for your project. It defines settings like the Solidity compiler version, network configurations, and the plugins and tasks your project uses.contracts: Contains your project’s Solidity contracts. You can also include Solidity test files here by using the.t.solextension.test: Used for TypeScript integration tests. You can also include Solidity test files here.ignition: Holds your Hardhat Ignition deployment modules, which describe how your contracts should be deployed.scripts: A place for any custom scripts that automate parts of your workflow. Scripts have full access to Hardhat’s runtime and can use plugins, connect to networks, deploy contracts, and more.
Step 3: Configure “hardhat.config.ts”
Before we make any changes to our Hardhat configuration file, let’s set some configuration variables we will be referring to within the file later.HEDERA_RPC_URL to https://localhost:7546
If you are use Testnet set HEDERA_RPC_URL to https://testnet.hashio.io/api.
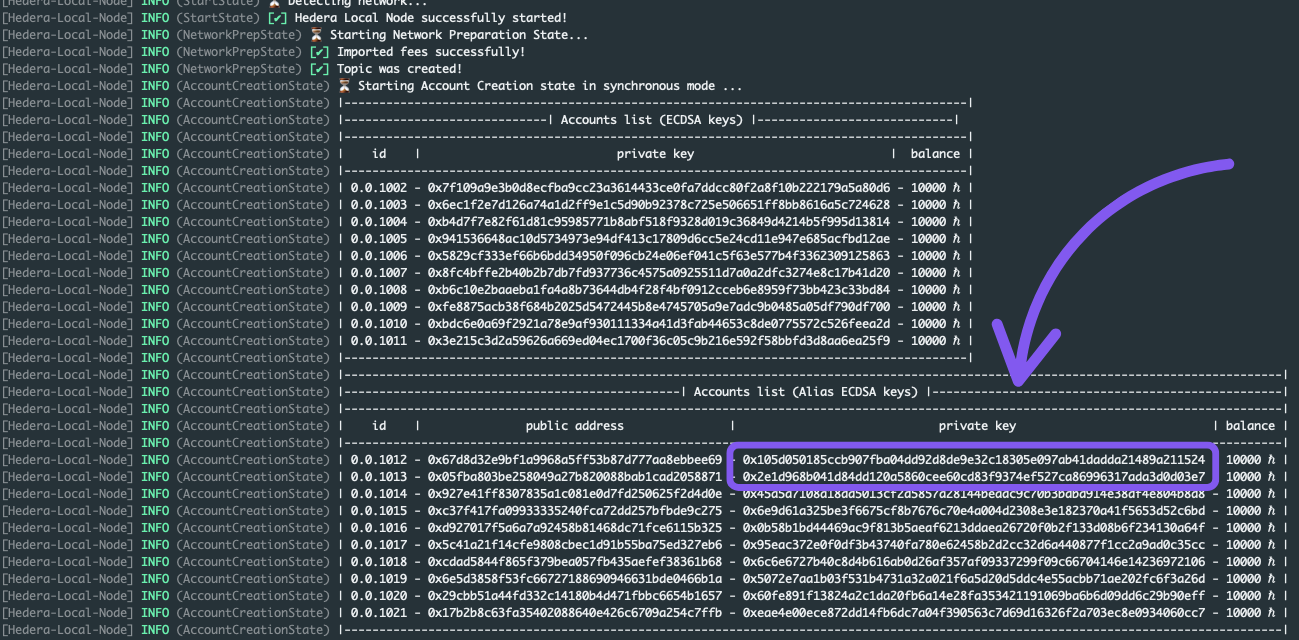
HEDERA_PRIVATE_KEY, enter 0x105d050185ccb907fba04dd92d8de9e32c18305e097ab41dadda21489a211524
Note: We got this private key from our console when we started our Hiero
Local Node.
HEDERA_PRIVATE_KEY, enter your testnet HEX Encoded Private Key for your ECDSA account which you can get by signing up on the Hedera Developer Portal
Now, we can update our Hardhat config file to include the Hiero Local Node as a custom network:
hardhat.config.ts
- Network config:
localurl: ➤ This is the Hedera JSON-RPC Relay endpoint provided by the local node (via Docker). It enables EVM-compatible tools like Hardhat and Ethers.js to interact with the Hedera network.accounts: ➤ One predefined ECDSA private key provided by the Hiero Local Node.
➤ This account is already funded, and can be used immediately to deploy and interact with smart contracts.
- Set paths:
./cache&./artifacts: Manage build outputs and compilation caching to speed up repeated runs.
Step 4: Build and Deploy
You can build the project using:test task:
ignition so we will remove all the unnecessary directories and files first:
scripts/send-tx.ts
Counter contract.
scripts/deploy.ts will have the following code:
Further Learning & Next Steps
Want to take your local development setup even further? Here are some excellent tutorials to help you dive deeper into smart contract development on Hedera using Hardhat and Ethers.js:- How to Mint and Burn an ERC-721 Token (Part 1)
Learn how to create a basic ERC-721 NFT, mint it, and burn it on Hedera. - Access Control, Token URI, Pause & Transfer (Part 2)
Extend your NFT with features like pausing, setting token URIs, and restricting minting to specific roles. - Upgrade Your NFT with UUPS Proxies (Part 3)
Learn how to add upgradability to your smart contracts using OpenZeppelin’s UUPS proxy pattern on Hedera.